


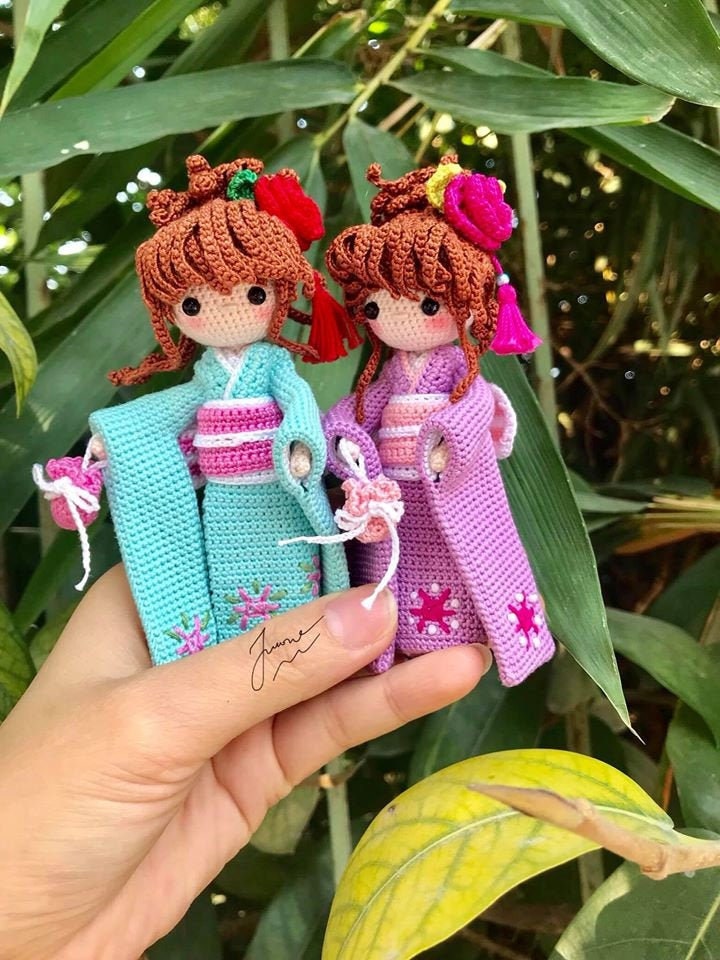
Ever felt that irresistible urge to create something utterly adorable with your own two hands? Something soft, cuddly, and brimming with personality? Then welcome to the enchanting world of crochet animals – or amigurumi, as it’s lovingly known in Japan! This isn’t just about following a pattern; it’s about breathing life into yarn, transforming simple stitches into charming companions.
This comprehensive guide, “From Novice to Expert: Mastering Advanced Crochet Animal Techniques,” is designed to take you on that very journey. Whether you’ve just picked up a crochet hook for the first time, or you’re already familiar with basic stitches, we’ll unlock the secrets to crafting breathtakingly realistic and uniquely whimsical handmade crochet animals. Forget mass-produced toys – we’re diving into the art of creating truly special crochet plushies and rochet stuffed animals.
We’ll start with the fundamentals – understanding the history of amigurumi, gathering your essential tools, and mastering those core stitches. But this isn’t just a ‘basics’ tutorial. We’ll quickly move beyond simple shapes, exploring techniques like intricate colorwork (think stripes, intarsia, and even Fair Isle!), adding texture with surface crochet, and even building wire armatures for fully posable creatures. Looking for easy crochet animals for beginners? We’ll cover that too! And for those seeking a challenge, we’ll delve into designing your own patterns and even explore the possibility of turning your passion into a business with our guide to selling your cute crochet animals.
Throughout this guide, you’ll discover a treasure trove of inspiration, learn how to navigate crochet animal patterns (including where to find amazing free crochet animal patterns!), and troubleshoot common challenges. We’ll show you how to create realistic animal faces, design adorable clothing and accessories, and truly master the art of how to crochet animals. Get ready to unleash your creativity and discover the joy of bringing these delightful creatures to life! Let’s begin!
Understanding Amigurumi: The Foundation
Amigurumi, the captivating Japanese art of crocheting or knitting small, stuffed toys, has taken the crafting world by storm. It’s more than just a hobby; it’s a pathway to creating adorable, personalized gifts, charming collectibles, and comforting companions. This section will lay the groundwork for your amigurumi journey, covering its origins, the essential tools you’ll need, the fundamental crochet stitches, and how to decipher those sometimes-intimidating crochet patterns. We’ll delve into everything a beginner needs to know to confidently embark on creating their first crochet animals.
What is Amigurumi and Its History?
The word “amigurumi” itself is derived from Japanese words: “ami,” meaning crocheted or knitted, and “nuigurumi,” meaning stuffed doll. While the techniques of crocheting and knitting have existed for centuries, the distinct style of amigurumi as we know it today emerged in Japan during the Meiji period (1868-1912). Initially, it was influenced by the introduction of knitting and crochet techniques from the West. However, it quickly evolved into a uniquely Japanese art form, characterized by its emphasis on cuteness – a concept deeply ingrained in Japanese culture known as kawaii.
Early examples of Japanese amigurumi dolls showcasing the traditional aesthetic
Early amigurumi often depicted simple animals, dolls, and food items. These weren’t just toys; they were often considered good luck charms or decorative objects. The style continued to develop throughout the 20th century, becoming increasingly popular in the 1990s and early 2000s, largely thanks to the rise of the internet and online crafting communities. Suddenly, patterns were readily available, and crocheters worldwide could share their creations and inspire one another. Today, amigurumi encompasses a vast range of designs, from incredibly realistic animal replicas to whimsical, cartoon-like characters. The beauty of amigurumi lies in its versatility and the endless possibilities for creative expression. It’s a testament to the power of a simple hook and yarn to bring joy and personality to life. The global popularity of handmade crochet animals continues to grow, fueled by the desire for unique, handcrafted items and the therapeutic benefits of the craft itself.
Essential Materials and Tools
Before you can begin bringing your crochet animal patterns to life, you’ll need to gather the right tools. Don’t worry, the initial investment isn’t huge! Here’s a breakdown of the essentials:
- Yarn: This is the foundation of your amigurumi. Cotton yarn is the most popular choice for several reasons. It holds its shape well, is durable, and is readily available in a wide range of colors. Acrylic yarn is another affordable option, but it can sometimes be less defined than cotton. Yarn weight is also important. DK (double knit) or worsted weight yarn are commonly used for amigurumi. Experiment with different textures and colors to achieve different effects.
- Crochet Hook: The size of your crochet hook should correspond to the weight of your yarn. The yarn label will usually recommend a hook size. For DK yarn, a 2.5mm – 3.5mm hook is typical. For worsted weight yarn, a 3.5mm – 4.5mm hook is a good starting point. Ergonomic hooks can be a lifesaver if you crochet for extended periods.
- Fiberfill Stuffing: This is what gives your amigurumi its shape. Polyester fiberfill is the most common choice, as it’s hypoallergenic and washable. You can also use cotton stuffing, but it may not hold its shape as well.
- Stitch Markers: These little helpers are essential for keeping track of your rounds, especially when working in continuous spirals (which is common in amigurumi). Simple plastic stitch markers work well, or you can use a small piece of contrasting yarn.
- Yarn Needle (Darning Needle): Used for weaving in ends and sewing pieces together. Choose a needle with a large eye to accommodate your yarn.
- Scissors: For cutting yarn.
- Safety Eyes: These are plastic eyes that have a locking washer on the back to prevent them from being pulled out. Important safety note: If you’re making amigurumi for babies or young children, it’s best to embroider the eyes instead of using safety eyes to avoid a choking hazard.
- Optional Tools: Wire cutters (for wire armatures), pins (for holding pieces together), a row counter (to keep track of rounds), and a blocking mat (for shaping your finished amigurumi).
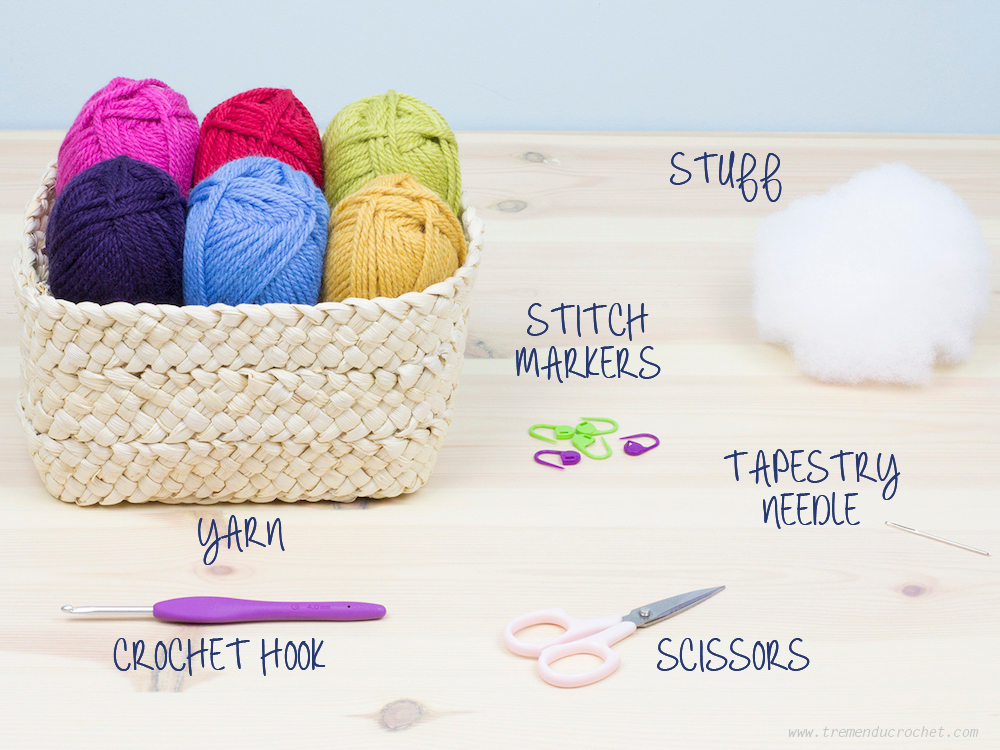
A collection of essential crochet tools and materials for amigurumi including yarn hooks stitch markers and safety eyes
Investing in quality tools will make your crochet animals more enjoyable to create and will result in a more professional-looking finish.
Basic Crochet Stitches for Amigurumi
Amigurumi primarily relies on a handful of basic crochet stitches. Mastering these will unlock a world of possibilities.
- Chain (ch): The foundation of most crochet projects.
- Single Crochet (sc): The most important stitch for amigurumi. It creates a dense fabric that’s perfect for stuffing. To single crochet: Insert your hook into the stitch, yarn over, pull up a loop, yarn over, and pull through both loops on the hook.
- Increase (inc): Used to add stitches and create curves. Typically, an increase involves working two single crochet stitches into the same stitch.
- Decrease (dec): Used to reduce stitches and create curves. There are several ways to decrease, but the most common method for amigurumi is the invisible decrease. This involves working a single crochet stitch over the front loops only of two stitches, creating a seamless decrease.
- Slip Stitch (sl st): Used to join rounds or finish off a project.
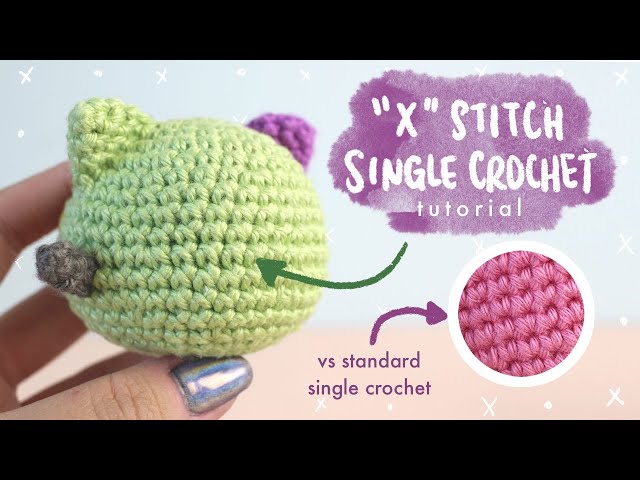
A closeup illustration demonstrating the single crochet stitch the foundation of amigurumi
Practice these stitches until they become second nature. There are countless video tutorials available online (YouTube is a fantastic resource!) that can help you visualize the techniques. Don’t be afraid to start with a simple project, like a small sphere, to practice your stitches and get a feel for the yarn and hook. Understanding these stitches is crucial for successfully creating easy crochet animals for beginners.
Reading Crochet Patterns: A Comprehensive Guide
Crochet patterns can seem daunting at first, filled with abbreviations and symbols. But once you understand the basics, you’ll be able to tackle even the most complex designs.
- Abbreviations: Crochet patterns use abbreviations to save space. Common abbreviations include: sc (single crochet), inc (increase), dec (decrease), ch (chain), sl st (slip stitch), st(s) (stitch/stitches), rnd (round). Most patterns will include a key to explain the abbreviations used.
- Pattern Structure: Amigurumi patterns are typically written in rounds, working in a continuous spiral. This means you don’t join each round with a slip stitch unless the pattern specifically instructs you to.
- Parentheses and Brackets: Parentheses ( ) often indicate a sequence of stitches to be repeated. For example, (sc, inc) x 6 means to single crochet, increase, repeat six times. Brackets [ ] are sometimes used to indicate a group of stitches that are worked into a single stitch.
- Stitch Counts: Pay close attention to the stitch count at the end of each round. This is a crucial way to ensure you’re on track. If your stitch count is off, you’ve likely made a mistake somewhere.
- Color Changes: Patterns will often indicate when to change colors. Follow the instructions carefully to create the desired effect.
- Assembly Instructions: After crocheting all the individual pieces, the pattern will provide instructions for assembling them. This usually involves sewing the pieces together with a yarn needle and stuffing them with fiberfill.

An example of a typical amigurumi crochet pattern highlighting the use of abbreviations and stitch counts
Don’t be afraid to start with a simple free crochet animal patterns to practice reading patterns. Look for patterns that are clearly written and include photos or diagrams. Online communities like Ravelry are excellent resources for finding patterns and getting help from other crocheters. Learning to read crochet patterns is a skill that will open up a world of creative possibilities, allowing you to create an endless variety of adorable crochet plushies and rochet stuffed animals. And remember, practice makes perfect! The more patterns you read, the more comfortable you’ll become with the terminology and structure.
Building Blocks: Creating Basic Animal Shapes
This section is the heart of learning to create crochet animals. It’s where the abstract concepts of stitches and patterns begin to translate into tangible forms. We’ll move beyond simply knowing how to crochet and start shaping the world of amigurumi with our own hands. Don’t be intimidated if it feels a little tricky at first; building these foundational shapes is like learning the alphabet – essential for everything that follows. The beauty of crochet animals lies in their construction from these simple building blocks, and mastering them will unlock a universe of creative possibilities.
The Magic Ring and Increasing/Decreasing
The magic ring (also known as the magic circle) is arguably the most important technique to learn when starting amigurumi. Unlike starting with a chain and joining, the magic ring allows you to create a tightly closed center, essential for preventing stuffing from escaping and achieving a neat, professional finish.
Here’s a step-by-step guide:
- Wrap the yarn around your fingers (usually index and middle) twice, creating an ‘X’.
- Insert your hook under the first strand and grab the second strand, pulling it under the first.
- Chain 1 (this doesn’t count as a stitch).
- Work the required number of single crochet stitches into the ring.
- Gently pull the yarn tail to tighten the ring closed. This is where the “magic” happens!
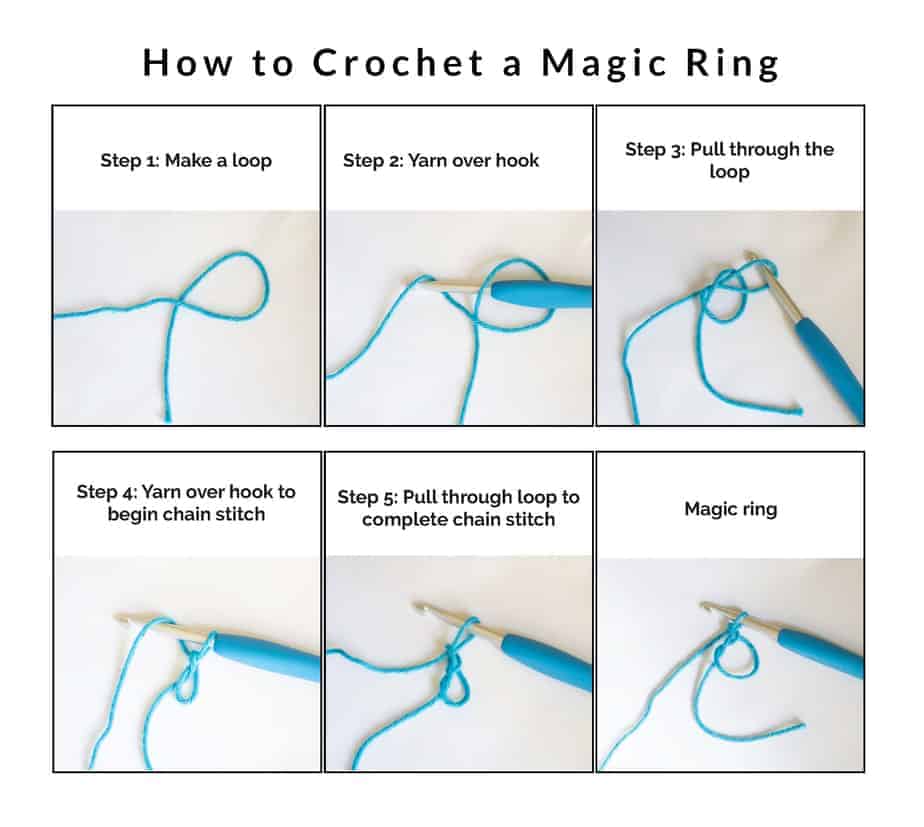
Stepbystep illustration of creating a magic ring for crochet
Mastering the magic ring takes practice. Don’t be discouraged if your first few attempts are a little messy. Experiment with different yarn weights and hook sizes to find what works best for you.
Now, let’s talk about increasing and decreasing. These are the techniques that allow us to shape our crochet animals from flat circles into three-dimensional forms.
- Increasing (inc): Typically, an increase involves working two single crochet stitches into the same stitch. This adds a stitch to the round, expanding the circle. Different patterns may use different increase methods (e.g., invisible increase), but the principle remains the same.
- Decreasing (dec): A decrease involves combining two stitches into one. The most common method is the invisible decrease, which creates a smoother, less noticeable decrease than a standard single crochet decrease. This reduces the stitch count, causing the circle to contract.
Understanding where to place your increases and decreases is crucial. Increases are generally distributed evenly around the round to maintain a smooth, circular shape. Decreases are used to create curves and points. The placement of decreases dictates the direction of the curve – more frequent decreases will create a sharper curve.
Crafting the Head: Spheres and Variations
The head is often the focal point of a crochet animal, so getting the shape right is vital. The most common head shape is a sphere, achieved through strategic increases and decreases.
- Start with a magic ring and 6 single crochet stitches.
- Round 2: Increase in each stitch (12 stitches).
- Round 3: *Single crochet in the next stitch, increase in the following stitch* Repeat 6 times (18 stitches).
- Round 4: *Single crochet in the next 2 stitches, increase in the following stitch* Repeat 6 times (24 stitches).
- Continue increasing in this manner, gradually increasing the number of single crochet stitches between each increase.
As you continue, you’ll notice the circle becoming more curved. To start decreasing and form the top of the head, begin decreasing evenly around the round.
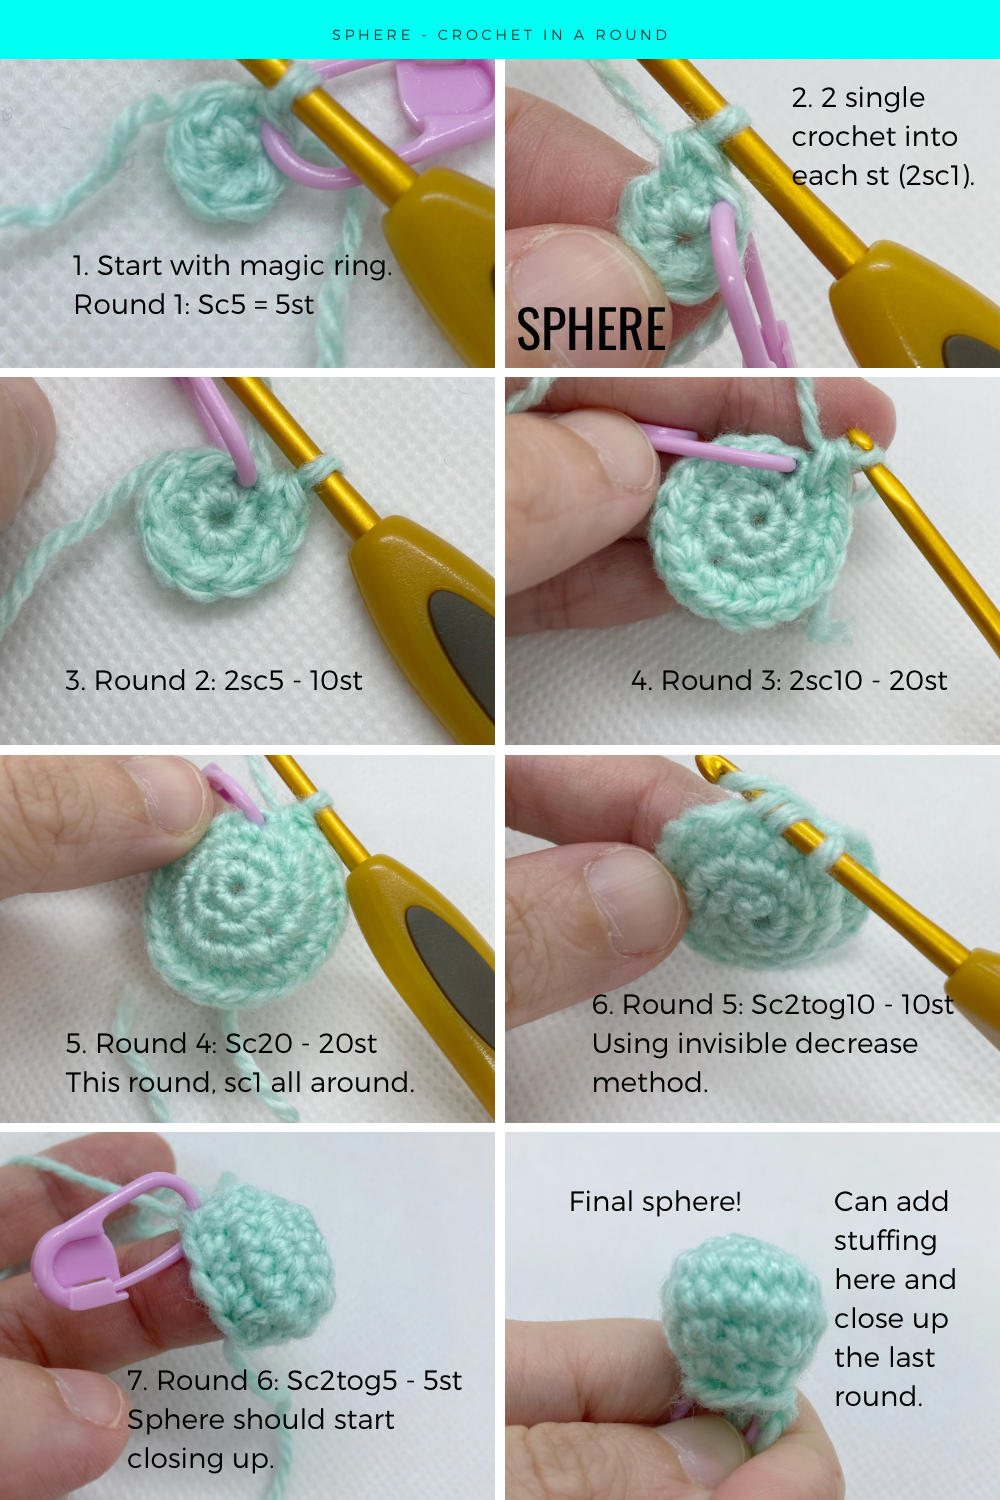
Diagram illustrating the increase and decrease pattern for creating a spherical amigurumi head
Variations:
- Elongated Heads: For animals like giraffes or horses, you’ll increase for more rounds before beginning to decrease, creating a more elongated shape.
- Flat Faces: To create a flatter face, decrease more rapidly on one side of the head.
- Snouts: A separate piece can be crocheted for the snout and then attached to the head.
Don’t be afraid to experiment with different increase/decrease patterns to achieve the desired head shape. A little trial and error is part of the learning process.
Forming the Body: Cylinders, Ovals, and More
Once you’ve mastered the sphere, creating the body becomes much easier. The body is often a variation of a cylinder or oval.
Cylinder:
- Start with a magic ring and 6 single crochet stitches.
- Single crochet in each stitch around (6 stitches).
- Repeat Round 2 for the desired height of the cylinder. This creates a straight, tube-like shape.
Oval:
To create an oval shape, you’ll gradually increase and then decrease.
- Start with a magic ring and 6 single crochet stitches.
- Round 2: Increase in each stitch (12 stitches).
- Round 3: *Single crochet in the next stitch, increase in the following stitch* Repeat 6 times (18 stitches).
- Continue increasing for several rounds, then begin decreasing in the same pattern as the increases.
Variations:
- Rounded Bodies: Increase and decrease more gradually to create a more rounded body shape.
- Segmented Bodies: For animals like caterpillars, you can crochet multiple segments and then join them together.
- Bellies: A separate piece can be crocheted for the belly and then attached to the body.
Remember to stuff the body firmly as you go to maintain its shape. Using a stuffing tool (or even a chopstick!) can help you reach tight spaces and ensure even distribution.
Attaching Limbs and Features: Techniques and Best Practices
Attaching limbs and features is where your crochet animal truly comes to life. There are several techniques you can use, each with its own advantages and disadvantages.
- Sewing: The most common method involves using a yarn needle and yarn to sew the limbs and features onto the body. Ensure the yarn is securely fastened to prevent them from coming loose.
- Joints: For posable animals, you can use plastic joints to connect the limbs to the body. This allows for a wider range of movement.
- Wire Armatures: As we’ll discuss in more detail later, wire armatures can be used to create fully posable crochet animals.
Best Practices:
- Positioning: Before attaching any limbs or features, carefully consider their placement. Use pins to hold them in place and ensure they are symmetrical.
- Secure Attachment: Make sure the limbs and features are securely attached to prevent them from falling off. Reinforce the stitching if necessary.
- Invisible Seams: Try to hide the stitching as much as possible to create a clean, professional finish.
- Safety Eyes: If making crochet animals for babies or young children, use safety eyes that are securely fastened or embroider the eyes instead.
Demonstration of different techniques for attaching limbs to an amigurumi body
Creating crochet animals is a journey of learning and experimentation. Don’t be afraid to try new techniques and explore different shapes and sizes. The more you practice, the more confident you’ll become, and the more beautiful and unique your creations will be. Remember, the goal is to have fun and express your creativity!
Advanced Techniques: Adding Detail and Realism
This section delves into the techniques that elevate your crochet animals from simple, charming creations to truly lifelike and captivating pieces. We’ll move beyond the foundational skills and explore methods to add depth, texture, and personality to your amigurumi. It’s here that the artistry of amigurumi truly shines, allowing you to express your creativity and bring your designs to life.
Colorwork: Stripes, Intarsia, and Fair Isle
Colorwork is arguably the most impactful way to add visual interest and detail to your crochet animals. It’s about more than just changing yarn colors; it’s about strategically using color to define shapes, create patterns, and tell a story.
- Stripes: The simplest form of colorwork, stripes are a fantastic starting point. Consider varying the width of the stripes for a more dynamic look. Experiment with different color combinations – complementary colors for a bold statement, analogous colors for a harmonious feel, or monochromatic shades for a subtle effect. When working stripes, be mindful of yarn management to avoid bulky seams or uneven tension.

A cute crochet fox with colorful stripes
- Intarsia: This technique allows you to create blocks of color within your work, perfect for depicting markings, patterns, or even entire sections of your animal. Unlike tapestry crochet (which carries the unused yarn along the row), intarsia uses separate balls of yarn for each color block, minimizing bulk and creating a cleaner finish. The key to successful intarsia is careful yarn management and weaving in the ends neatly. It’s ideal for creating realistic animal coats, like the spots on a leopard or the stripes on a zebra.
- Step-by-Step Intarsia:
- Cast on the required number of stitches for the base color.
- Begin crocheting in the base color.
- When you reach the point where you want to introduce a new color, start a new ball of yarn.
- Work the new color block, carrying the unused yarn behind the working yarn.
- When you need to switch back to the base color, drop the new color yarn and pick up the base color yarn, working from the back.
- Weave in all yarn ends securely on the wrong side of the work.
- Step-by-Step Intarsia:
- Fair Isle: A more complex colorwork technique, Fair Isle involves using two colors per row to create intricate, repeating patterns. It’s traditionally associated with stranded knitting, but can be adapted for crochet. Fair Isle requires careful tension control to prevent puckering or distortion. It’s best suited for smaller details on your crochet animals, such as a patterned sweater or a decorative collar.
- Tips for Fair Isle Crochet:
- Use two strands of yarn held together for each color to create a thicker fabric and better coverage.
- Alternate colors frequently to distribute the floats (the strands of yarn carried across the back of the work) evenly.
- Work loosely to avoid puckering.
- Block your finished piece to even out the stitches and enhance the pattern.
- Tips for Fair Isle Crochet:
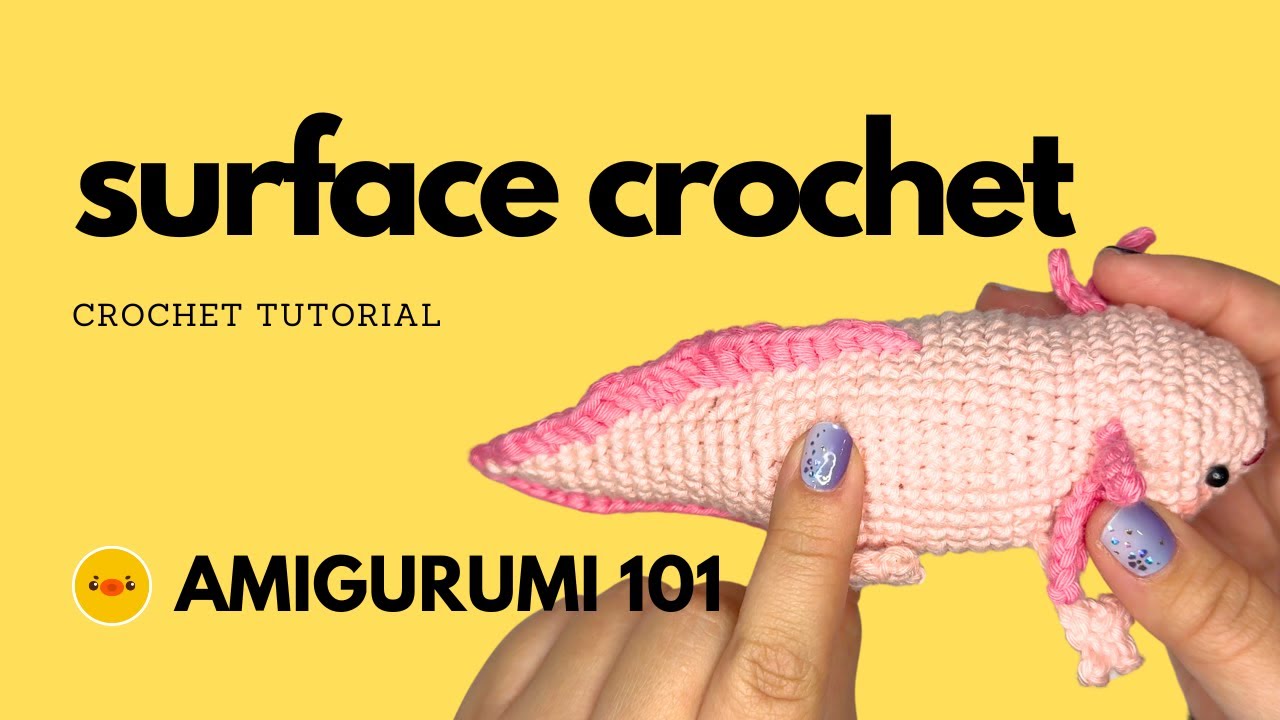
Surface Crochet: Adding Texture and Embellishments
Surface crochet is a fantastic technique for adding details after your amigurumi is complete. It’s essentially crocheting directly onto the surface of your work, allowing you to create raised designs, outlines, and embellishments.
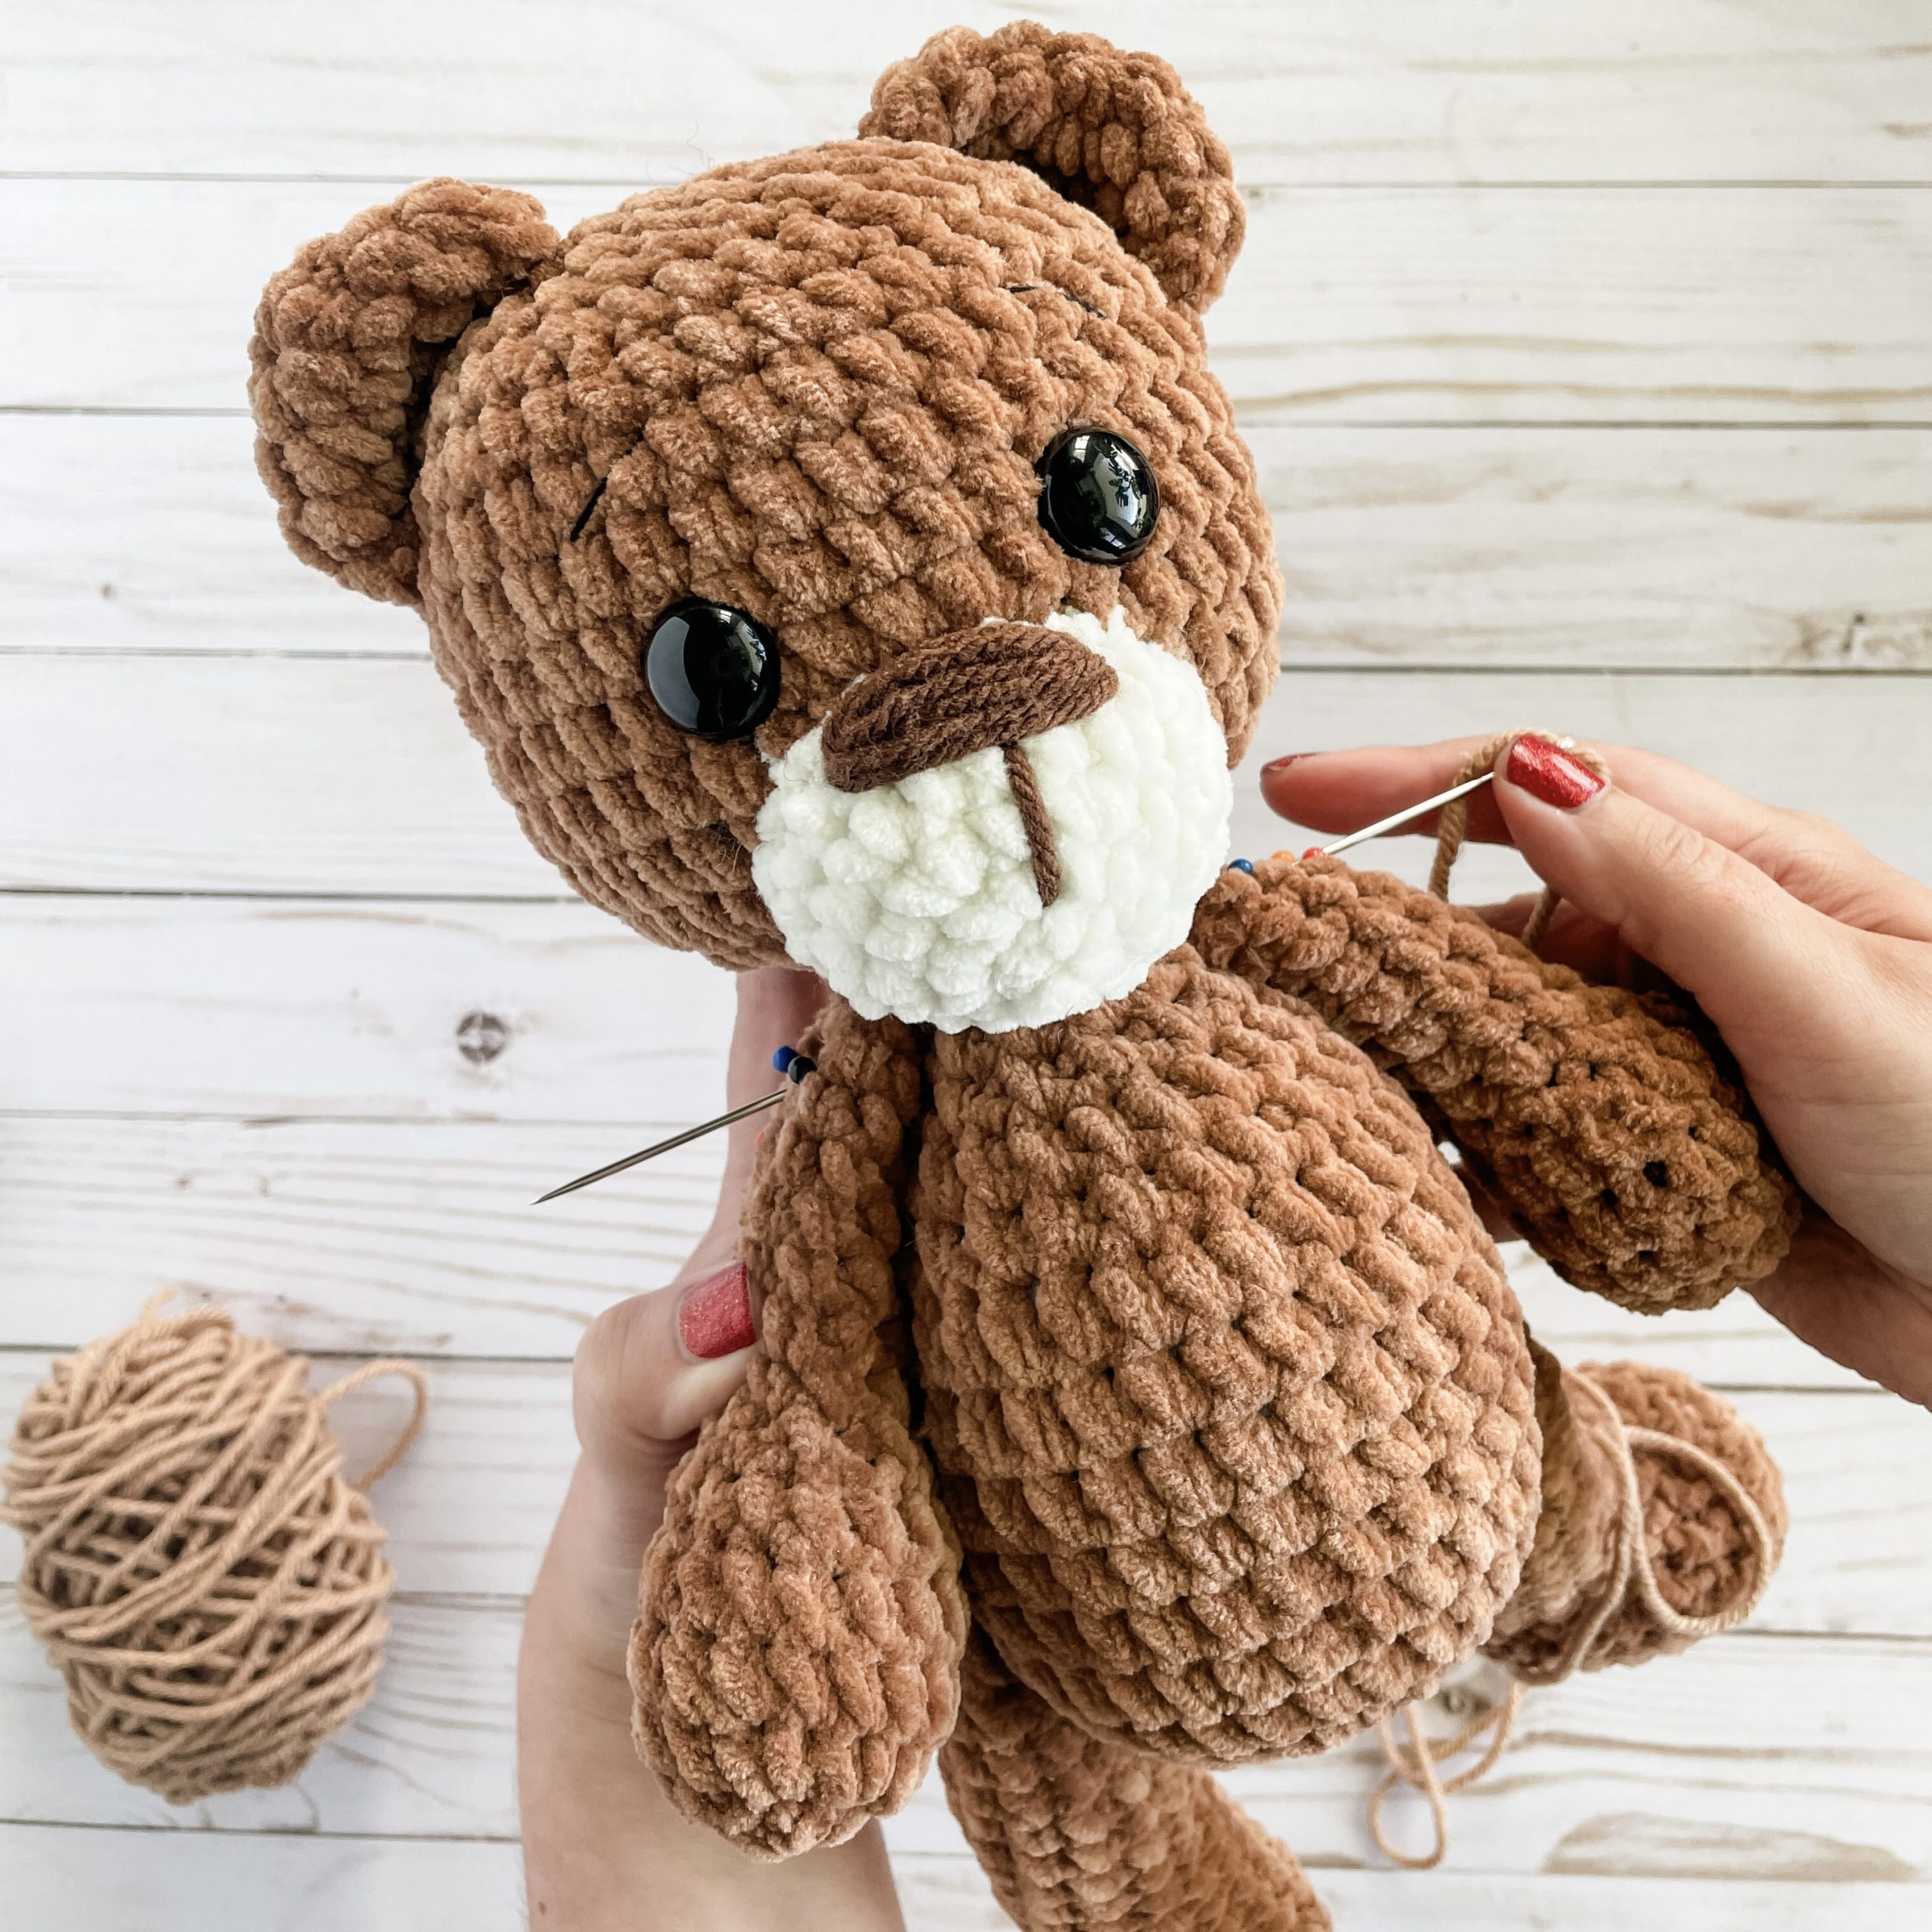
- Outlining: Use surface crochet to define the features of your animal, such as the eyes, nose, mouth, or claws. This can add a significant amount of definition and realism.
Surface crochet used to outline the features of a crochet bear
- Adding Texture: Create fur-like textures by working small, closely spaced stitches onto the surface of your animal. This is particularly effective for creating realistic animal coats. You can also use different stitch heights to create varying levels of texture.
- Embellishments: Add flowers, leaves, or other decorative elements using surface crochet. This is a great way to personalize your crochet animals and add a touch of whimsy.
- How to Surface Crochet:
- Insert your hook through the fabric of your amigurumi.
- Yarn over and pull up a loop.
- Yarn over and pull through both loops on your hook.
- Repeat steps 2 and 3 to create a chain or single crochet stitch on the surface of your work.
- Move your hook to the next desired location and repeat.
- How to Surface Crochet:
Wire Armatures: Posable Animals
Want to create crochet animals that can be posed and displayed in a variety of positions? Wire armatures are the answer. A wire armature is a skeletal structure made of wire that is inserted into your amigurumi, allowing you to bend and shape it.
- Choosing the Right Wire: Use craft wire or armature wire that is strong enough to hold its shape but flexible enough to bend easily. The gauge of the wire will depend on the size of your animal.
- Constructing the Armature: Create a basic skeleton for your animal, including a spine, limbs, and potentially a neck and tail. Secure the wire pieces together using tape or wire connectors.
- Inserting the Armature: Carefully insert the armature into your amigurumi, ensuring that it is securely anchored within the stuffing.
- Stuffing Around the Wire: Stuff around the wire armature to create a smooth, seamless finish. Be careful not to poke yourself with the wire!
- Safety Considerations: Always cover the ends of the wire with tape or fabric to prevent injury. Be mindful of the wire when handling your amigurumi, especially if it is intended for a child.
Sculpting with Crochet: Creating Unique Shapes
This technique goes beyond simply following a pattern; it’s about using your crochet skills to create truly unique and sculpted shapes. It requires a strong understanding of amigurumi construction and a willingness to experiment.
- Understanding Anatomy: Studying animal anatomy is crucial for creating realistic sculpted shapes. Pay attention to the underlying bone structure and muscle groups.
- Using Increments and Decreases Strategically: Master the art of increasing and decreasing to create curves, contours, and other sculpted details.
- Partial Stuffing: Stuffing your amigurumi partially allows you to shape it more easily. You can add more stuffing as needed to achieve the desired form.
- Needle Sculpting: Use a tapestry needle to gently manipulate the stuffing and refine the shape of your amigurumi.
- Experimentation: Don’t be afraid to try new things! The best way to learn sculpting with crochet is to practice and experiment with different techniques.
- Creating a Realistic Muzzle:
- Start with a basic sphere for the head.
- Use increases and decreases to shape the muzzle.
- Partially stuff the head, leaving the muzzle slightly understuffed.
- Use a tapestry needle to sculpt the muzzle, creating a defined nose and lips.
- Add details such as nostrils and a mouth using surface crochet or embroidery.
- Forming Realistic Paws:
- Crochet a small cylinder for the leg.
- Use decreases to shape the paw.
- Stuff the paw firmly.
- Use surface crochet to add toe details.
- Advanced Tip: Consider using a slightly tighter stitch than usual to create a firmer fabric that holds its shape better.
- Creating a Realistic Muzzle:
These advanced techniques will empower you to create crochet animals that are not only adorable but also incredibly detailed and realistic. Remember that practice is key, and don’t be afraid to experiment and develop your own unique style. The world of amigurumi is vast and full of possibilities – embrace the challenge and enjoy the journey!
English Section – Expanding on Wire Armatures for Advanced Posability
For those seeking truly dynamic and expressive crochet animals, mastering wire armatures goes beyond simply inserting a wire into the body. It’s about understanding joint mechanics and creating a framework that allows for a wide range of poses.
- Joint Construction: Instead of a single continuous wire, consider segmenting the armature into multiple pieces connected by joints. These joints can be created using small beads, crimp tubes, or even tightly wrapped yarn. This allows for greater flexibility and articulation. For example, a bear’s arm could have a shoulder joint, an elbow joint, and a wrist joint.
- Ball-and-Socket Joints: For more complex poses, explore creating ball-and-socket joints. This involves forming a small ball of wire at the end of one armature piece and inserting it into a socket formed by another piece. This allows for a full range of motion.
- Securing the Armature: Ensure the armature is securely anchored within the amigurumi. Use strong thread to stitch the wire to the crochet fabric at key points, preventing it from shifting or pulling out.
- Weighting the Base: Adding a small amount of weight to the base of your amigurumi (e.g., plastic pellets or glass beads) can improve its stability and prevent it from tipping over when posed.
- Consider the Animal’s Anatomy: The type of armature you create should be tailored to the animal you are making. A snake will require a very different armature than a giraffe. Research the animal’s skeletal structure to understand how its joints move.
- Safety First: Always prioritize safety when working with wire. Cover sharp ends with tape or fabric, and be mindful of the wire when handling your finished amigurumi. If creating toys for children, ensure the wire is completely enclosed and cannot be accessed.
By investing time in learning these advanced armature techniques, you can create crochet animals that are truly lifelike and expressive, capable of capturing a wide range of emotions and poses. This level of detail will undoubtedly elevate your amigurumi creations to a new level of artistry.
Mastering Complex Animal Designs
This section delves into the realm of taking your crochet animals from charmingly simple to strikingly realistic and uniquely personalized. It’s about moving beyond the basic shapes and techniques to truly capture the essence of the animal you’re creating, and adding those special touches that elevate your work from a craft project to a piece of art. We’ll explore advanced techniques, pattern modification, and troubleshooting to help you overcome challenges and achieve professional-looking results.
Crocheting Realistic Animal Faces
Creating a realistic animal face is arguably the most challenging – and rewarding – aspect of amigurumi. It’s where personality truly shines through. This isn’t just about attaching eyes; it’s about sculpting the muzzle, defining the cheeks, and conveying emotion.
- Understanding Animal Anatomy: Before you even pick up your hook, study the animal you’re aiming to create. Look at photographs, observe their facial structure, and pay attention to the subtle curves and angles. Consider the placement of features – how far apart are the eyes? How long is the snout? What is the shape of the ears?
- Sculpting with Increases and Decreases: The key to shaping a realistic face lies in strategic increases and decreases. Instead of uniform rounds, you’ll be manipulating the stitch count to create curves, bulges, and indentations. For example, to create a prominent snout, you might increase more rapidly in the center of the face and then decrease to form the muzzle.
- Using Different Stitch Techniques: Explore beyond the basic single crochet. Consider using techniques like the invisible decrease to create smoother transitions and avoid noticeable bumps. The waistcoat stitch (also known as the invisible join) is crucial for a clean finish, especially around the face.
- Embroidery for Detail: Embroidery is your friend! Use it to add details like wrinkles around the eyes, subtle shading on the nose, and even individual whiskers. Experiment with different thread weights and colors to achieve the desired effect. A fine embroidery floss in a slightly darker shade than the yarn can create realistic shadows.
- Eye Placement and Type: The eyes are the windows to the soul, even in crochet animals. Consider using safety eyes for a secure attachment, especially for toys intended for children. However, for a more realistic look, you can embroider the eyes. Pay close attention to the angle and placement of the eyes – even a slight adjustment can dramatically change the expression.
- Muzzle and Nose Shaping: The muzzle is often the focal point of the face. Use a combination of increases, decreases, and stuffing techniques to create the desired shape. For example, a rounded muzzle might be achieved by increasing evenly around a section, while a pointed muzzle might require more focused decreases.
- Example: Crocheting a Realistic Fox Face: Start with a magic ring and increase to form the base of the head. Gradually decrease to shape the head, then increase more rapidly in the snout area. Use embroidery to define the nose and mouth, and carefully position the safety eyes to create a sly, intelligent expression.
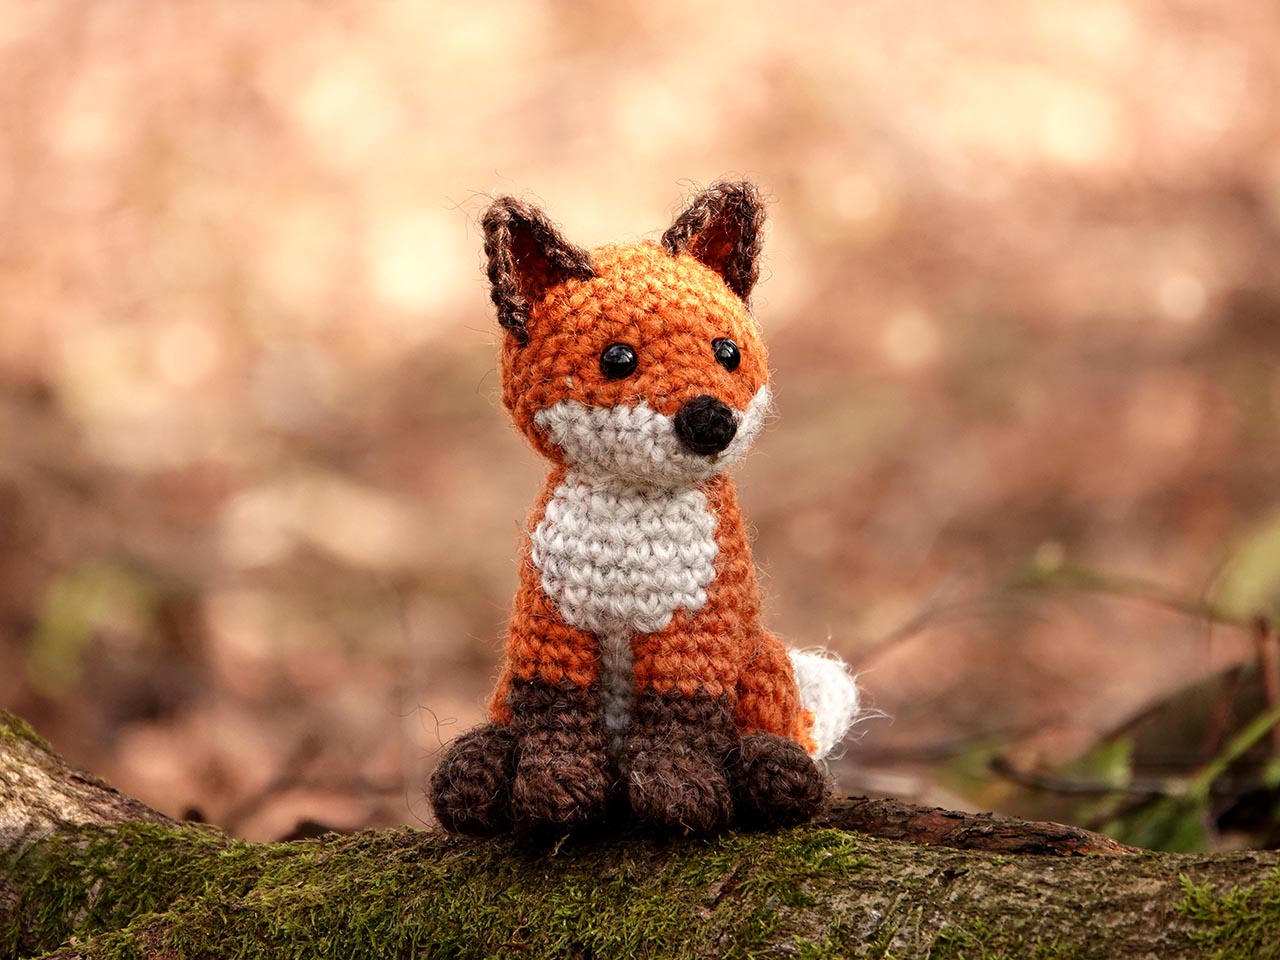
A detailed closeup of a crocheted fox face showcasing realistic embroidery and eye placement
Designing and Implementing Animal Clothing & Accessories
Once you’ve mastered the art of creating realistic animals, why not add a touch of whimsy with clothing and accessories? This is where your creativity can truly run wild.
- Scale and Proportion: The most important thing to remember is scale. Clothing and accessories should be proportionate to the animal’s size. A tiny hat on a large elephant will look ridiculous, while a massive scarf on a small mouse will be overwhelming.
- Simple Garments: Start with simple garments like scarves, hats, and bandanas. These are relatively easy to crochet and can add a lot of personality to your crochet animals.
- More Complex Designs: Once you’re comfortable with the basics, you can move on to more complex designs like sweaters, dresses, and even tiny coats. Consider using different stitch patterns to create texture and visual interest.
- Accessories: Don’t forget the accessories! Tiny backpacks, glasses, bows, and even miniature tools can add a unique touch to your creations.
- Pattern Design: Designing patterns for animal clothing requires careful planning. Start by measuring your animal and creating a basic template. Then, crochet a swatch to determine the appropriate yarn weight and stitch gauge.
- Attachment Methods: Securely attaching clothing and accessories is crucial. Use yarn and a tapestry needle to sew the items onto the animal, or consider using small buttons or snaps for removable garments.
- Example: Designing a Sweater for a Bear: Measure the bear’s chest and body length. Crochet a simple rectangle to form the body of the sweater, and then shape the sleeves by decreasing stitches. Add a small collar and buttons for a finishing touch.
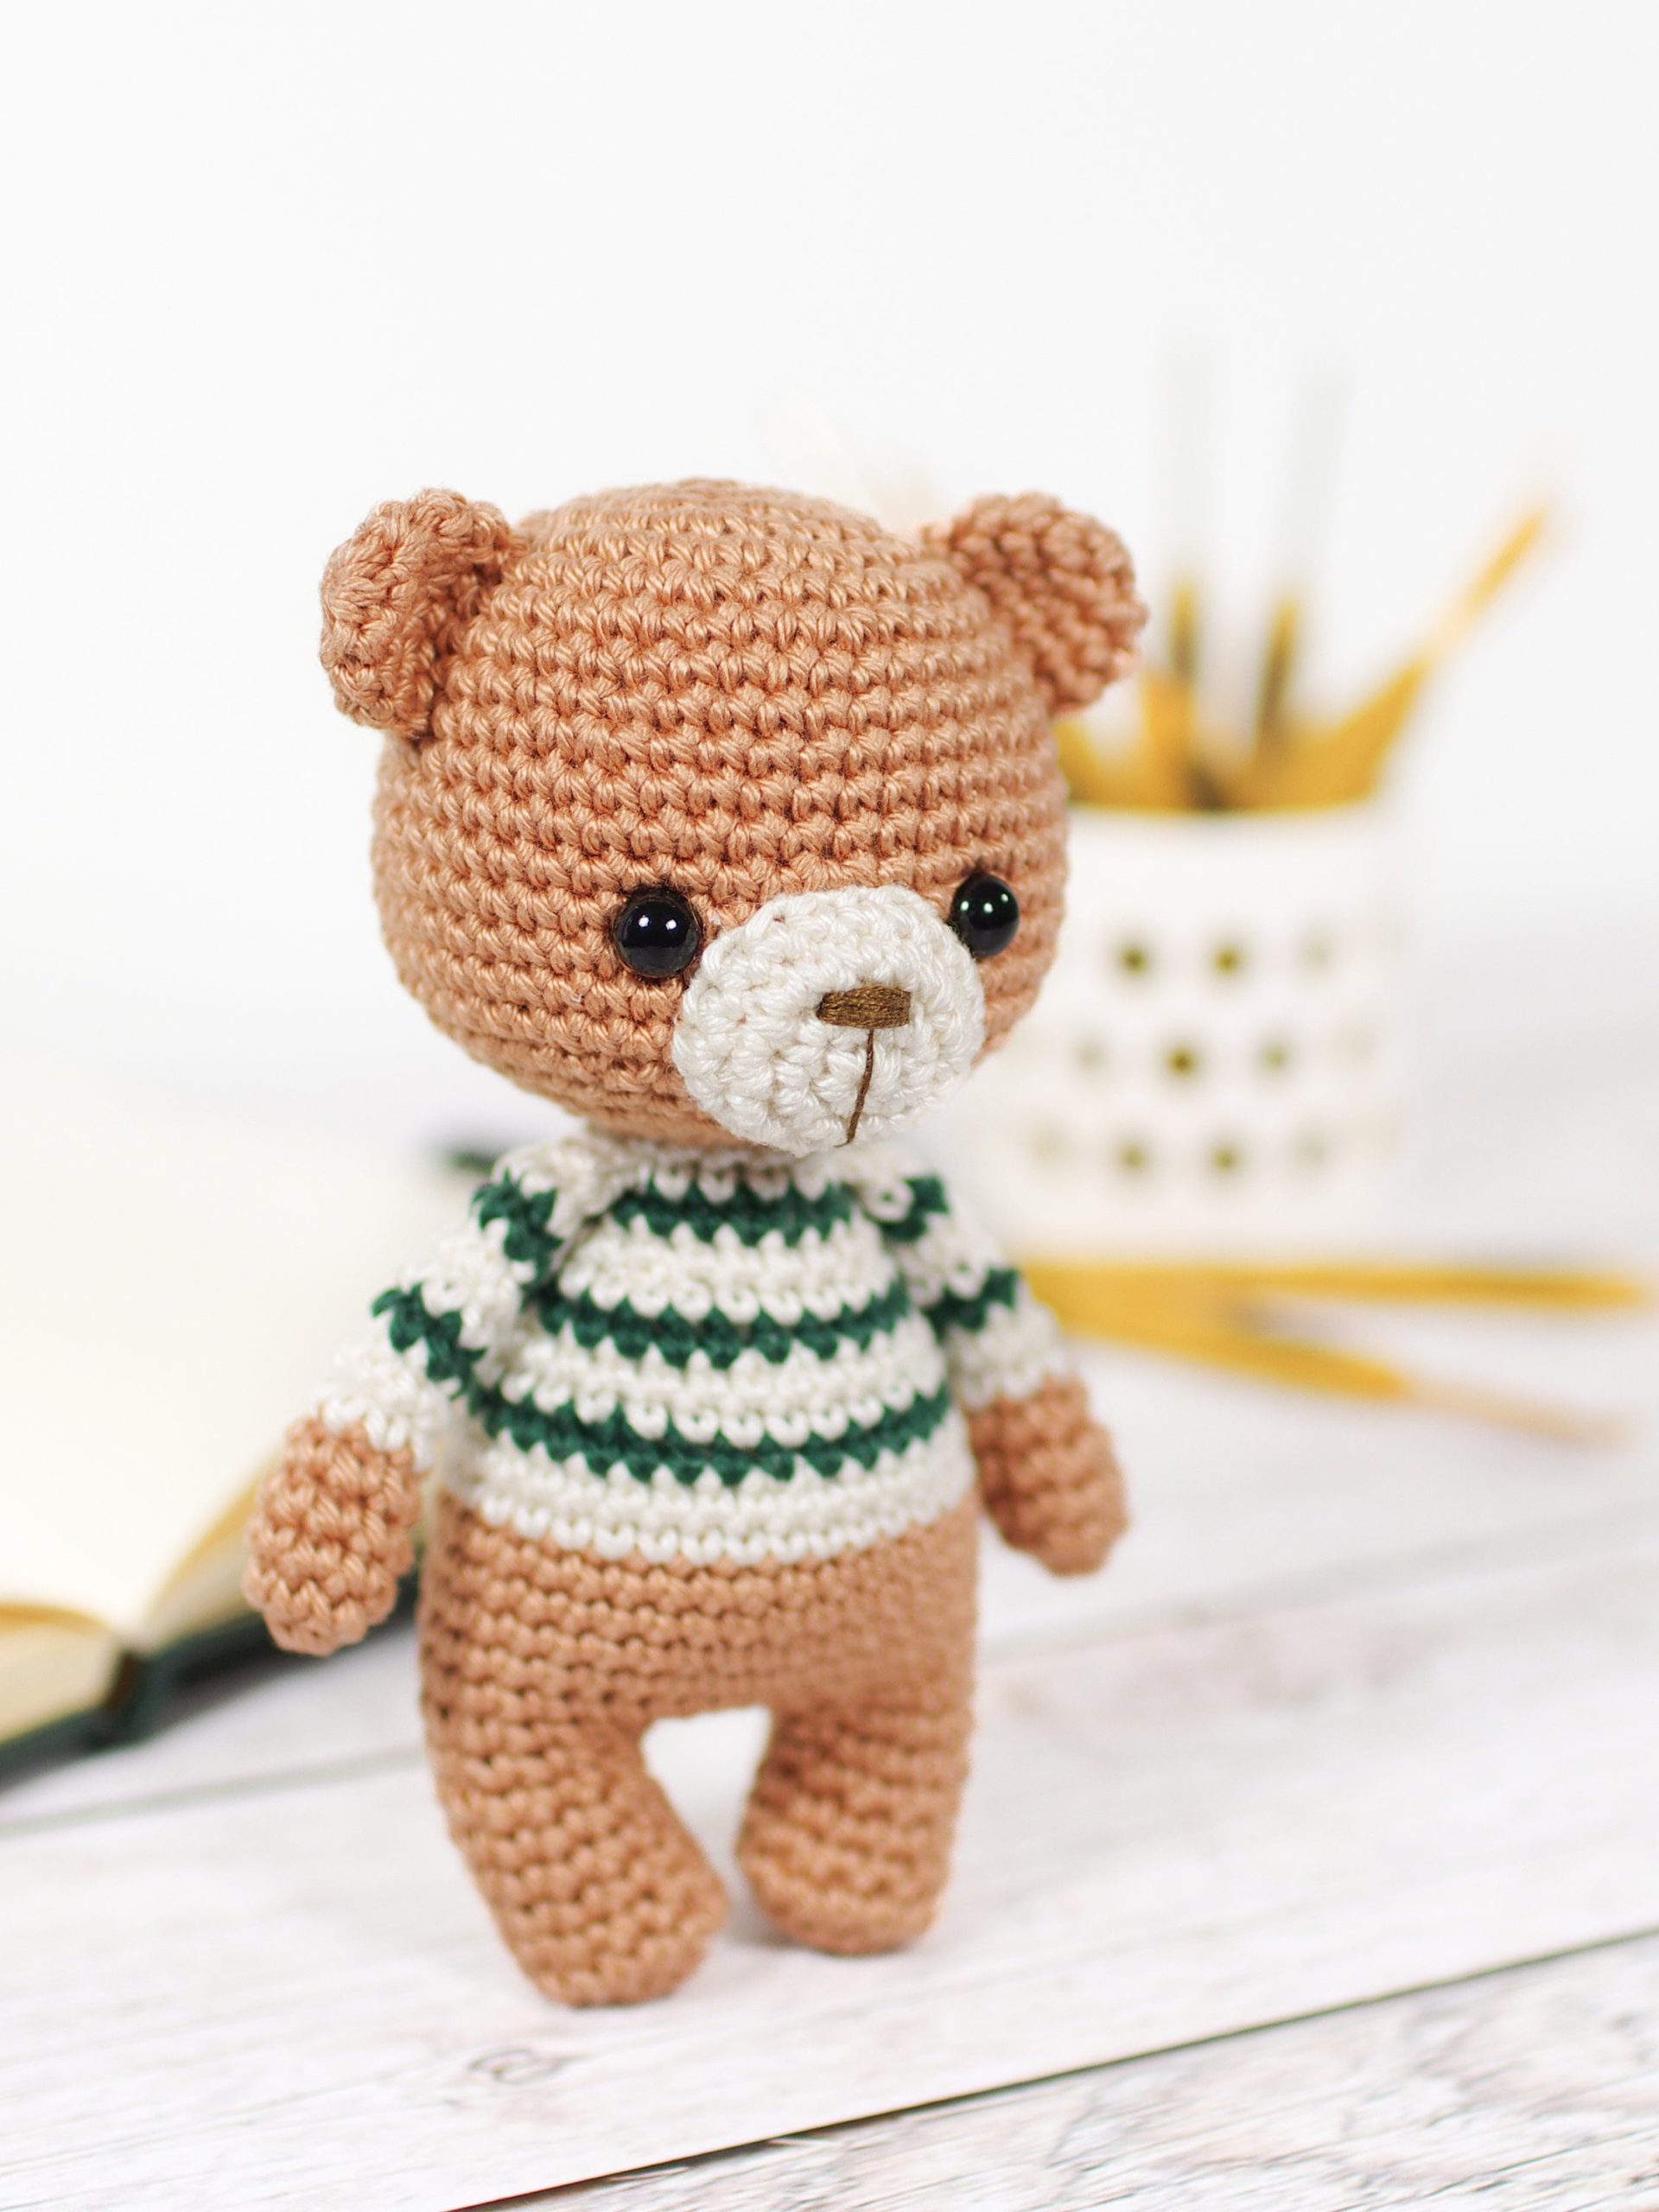
A cute crochet bear wearing a handmade striped sweater and a tiny bow tie
Advanced Pattern Modification and Customization
Learning to modify existing patterns and create your own customizations is a game-changer. It allows you to truly personalize your crochet animals and bring your unique vision to life.
- Understanding Pattern Structure: Before you start modifying a pattern, take the time to understand its structure. Identify the key elements – the head, body, limbs, and any accessories.
- Scaling Patterns: If you want to create a larger or smaller version of an animal, you’ll need to adjust the pattern accordingly. This involves increasing or decreasing the number of stitches in each round. Be mindful of maintaining the proportions of the animal.
- Changing Shapes: You can modify the shape of an animal by altering the increase and decrease patterns. For example, to make a longer body, you might add more rounds to the body section.
- Adding Details: Don’t be afraid to add your own details to a pattern. This could include adding stripes, spots, or other markings. You can also experiment with different stitch patterns to create texture and visual interest.
- Creating Variations: Use a base pattern as a starting point and then create variations by changing the colors, yarn weights, or accessories.
- Writing Your Own Patterns: Once you’re comfortable with modifying patterns, you can start writing your own. This requires careful attention to detail and clear instructions.
- Example: Modifying a Bunny Pattern to Create a Lop-Eared Bunny: The original pattern might call for upright ears. To create lop ears, you can crochet the ears longer and then add a wire armature to allow them to droop.
Troubleshooting Common Amigurumi Challenges
Even experienced crocheters encounter challenges when creating amigurumi. Here are some common problems and how to solve them:
- Uneven Stitch Tension: This can result in a misshapen animal. Practice maintaining consistent tension throughout your work. Use a stitch marker to remind yourself to check your tension regularly.
- Gaps Between Stitches: This can happen if your stitches are too loose. Try using a smaller hook or tightening your tension.
- Visible Increases and Decreases: Use the invisible increase and decrease techniques to minimize the appearance of these stitches.
- Stuffing Issues: Uneven stuffing can result in a lopsided animal. Stuff firmly and evenly, paying attention to the shape of the animal. Use a stuffing tool to reach tight spaces.
- Safety Eye Problems: Ensure the safety eyes are securely attached. If they’re loose, they could pose a choking hazard. Use a washer to secure the eyes properly.
- Pattern Errors: Sometimes, patterns contain errors. Double-check the instructions and compare them to the photos. If you find an error, try to figure out the correct solution based on the overall pattern structure.
- Color Changes: When changing colors, be sure to carry the yarn up the side or weave in the ends securely to avoid unsightly gaps.
- Maintaining Shape: Use a firm yarn and consistent stuffing to help your crochet animals hold their shape. Wire armatures can also be used to provide additional support.
This section provides a solid foundation for taking your amigurumi skills to the next level. Remember to practice, experiment, and most importantly, have fun! The world of crochet animals is vast and rewarding, and there’s always something new to learn.
Beyond the Basics: Expanding Your Amigurumi Skills
This section is for the crocheter who has mastered the fundamentals and is eager to push their amigurumi skills to the next level. It’s about moving beyond simple shapes and predictable patterns, and venturing into the realm of dynamic poses, unique textures, personalized designs, and even turning your passion into a potential income stream. It’s a journey of exploration, experimentation, and ultimately, creative fulfillment.
Creating Articulated Joints for Dynamic Poses
The magic of bringing a crochet animal to life isn’t just in its form, but in its ability to express form. Static poses are lovely, but articulated joints allow you to create animals that can sit, stand, wave, or even mimic playful actions. This adds a whole new dimension to your creations, making them more engaging and realistic.
There are several methods for creating articulated joints, each with its own level of complexity and aesthetic.
- Button Joints: This is a relatively simple and beginner-friendly technique. You use buttons and yarn to create a pivot point. The process involves crocheting the body parts separately, then using yarn to securely attach them to buttons sewn onto the body. The yarn acts as a flexible connector, allowing for movement. This method is best suited for smaller amigurumi and less strenuous poses.
- Plastic Joints (Safety Joints): These are specifically designed for plushies and are readily available online. They consist of two parts that snap together, securing the limbs to the body. They offer a more robust and professional look than button joints, and are suitable for larger animals and more dynamic poses. It’s crucial to ensure the joints are securely fastened to prevent them from coming loose, especially if the crochet animal is intended for a child.

Safety joints being used to attach a crochet bunnys arm - Wire Armatures: For truly posable animals, a wire armature is the way to go. This involves inserting a flexible wire (floral wire, craft wire, or even pipe cleaners) into the body and limbs during the stuffing process. The wire provides internal support and allows you to bend and shape the animal into almost any pose. This technique requires more skill and patience, as you need to carefully conceal the wire within the crochet fabric. Consider using a thicker yarn to help hide the wire and prevent it from poking through.
- Split Joints: A more advanced technique, split joints involve creating a hollow space within the body and limbs, then connecting them with a strong, flexible cord or wire. This allows for a wider range of motion and a more natural look.
Tips for Articulated Joints:
- Always reinforce the attachment points with extra stitching.
- Use a strong yarn that won’t easily break.
- Test the joints thoroughly to ensure they are secure and can withstand movement.
- Consider the weight of the animal when choosing a joint method. Heavier animals will require more robust joints.
Exploring Different Yarn Weights and Textures
The yarn you choose dramatically impacts the look and feel of your crochet animals. Moving beyond basic worsted weight acrylic yarn opens up a world of possibilities.
- Fingering/Sock Weight Yarn: Creates incredibly detailed and delicate amigurumi. Perfect for miniature animals or intricate designs. Requires a smaller hook and more patience.

A miniature crochet fox made with fingering weight yarn - DK (Double Knit) Weight Yarn: A good middle ground between worsted and fingering. Offers a nice balance of detail and speed.
- Bulky/Chunky Weight Yarn: Creates quick and cuddly crochet animals. Ideal for larger projects or when you want a more substantial feel.
- Chenille Yarn: Adds a super-soft and plush texture. Great for creating incredibly huggable animals. Be aware that chenille yarn can be more difficult to work with, as the fibers can obscure the stitches.
- Cotton Yarn: Provides excellent stitch definition and a durable finish. A popular choice for amigurumi that will be handled frequently.
- Wool Yarn: Offers a natural and warm texture. Can be more expensive than acrylic or cotton.
- Novelty Yarns: Experiment with textured yarns, fuzzy yarns, or even yarns with sequins or beads to add unique visual interest to your crochet animals.
Beyond Weight: Texture Matters
Don’t just think about weight; consider the texture of the yarn. A slub yarn will create a more rustic look, while a mercerized cotton will have a beautiful sheen. Mixing different yarn textures within a single project can add depth and complexity. For example, using a fluffy yarn for the mane of a lion or a textured yarn for the fur of a bear.
Designing Your Own Amigurumi Patterns
Once you’ve mastered existing patterns, the next logical step is to create your own! This is where your creativity can truly shine.
- Start with a Sketch: Begin by sketching your animal design. Consider the proportions, pose, and overall aesthetic.
- Break it Down into Shapes: Identify the basic shapes that make up the animal (spheres, cylinders, cones, etc.).
- Calculate Stitch Counts: This is the most challenging part. Start with a small swatch to determine your gauge (stitches per inch). Then, use this gauge to calculate the number of stitches needed to create each shape. There are online calculators and resources available to help with this process.
- Write Clear Instructions: Write your pattern in a clear, concise, and easy-to-follow manner. Include stitch abbreviations, round-by-round instructions, and clear diagrams or photos.
- Test Your Pattern: Have someone else test your pattern to identify any errors or areas that need clarification.
- Consider Using Pattern Writing Software: Programs like Stitch Fiddle or Amigurumi Pattern Designer can help you create professional-looking patterns.
Resources for Pattern Design:
- Ravelry: A great place to find inspiration and see how other designers structure their patterns.
- Online Tutorials: Search for “how to write a crochet pattern” on YouTube or Google.
- Pattern Design Books: Several books are dedicated to the art of crochet pattern design.
Selling Your Crochet Creations: A Guide to Starting a Business
Turning your crochet animals hobby into a business can be incredibly rewarding. Here’s a guide to get you started:
- Legal Considerations: Research the legal requirements for starting a business in your area (business license, sales tax permit, etc.).
- Pricing: Calculate your costs (yarn, stuffing, safety eyes, time, etc.) and add a profit margin. Research the prices of similar crochet animals on Etsy and other platforms to get an idea of the market rate.
- Online Platforms:
- Etsy: A popular marketplace for handmade goods.
- Shopify: Allows you to create your own online store.
- Ravelry: Has a marketplace for crochet patterns and finished objects.
- Social Media (Instagram, Facebook): Use social media to promote your creations and drive traffic to your online store.
- Craft Fairs and Markets: Participating in local craft fairs and markets is a great way to reach a wider audience and get direct feedback from customers.
- Photography: High-quality photos are essential for showcasing your crochet animals online. Use good lighting and a clean background.
- Customer Service: Provide excellent customer service to build a loyal customer base.
- Branding: Develop a unique brand identity (logo, color scheme, packaging) to help your business stand out.
- Shipping: Determine your shipping costs and packaging materials.
Marketing Your Business:
- Social Media Marketing: Post regularly on social media, engage with your followers, and run contests or giveaways.
- Email Marketing: Build an email list and send out newsletters with updates on new products, promotions, and events.
- Collaborations: Collaborate with other crafters or businesses to reach a wider audience.
- SEO (Search Engine Optimization): Optimize your online store and product listings for search engines.
Starting a business takes time and effort, but with passion, dedication, and a little bit of business savvy, you can turn your love of crochet animals into a successful venture.
The Joy of Creation: Inspiration and Continued Growth
The journey of mastering crochet animals, or amigurumi, doesn’t end with complex patterns or advanced techniques. It’s a continuous cycle of learning, experimenting, and, most importantly, finding joy in the creative process. This section delves into nurturing that joy, seeking inspiration, and expanding your skills beyond the established boundaries. It’s about transforming a hobby into a fulfilling passion and potentially, a rewarding venture.
Finding Your Muse: Sources of Inspiration
Inspiration is the lifeblood of any creative pursuit. For amigurumi artists, it can come from anywhere – the natural world, beloved characters, everyday objects, or even a simple color palette. Don’t limit yourself to solely looking at other crochet animals; broaden your horizons.
- Nature’s Palette: The animal kingdom is a treasure trove of inspiration. Observe the intricate patterns on butterfly wings, the textures of a lion’s mane, or the subtle color variations in a bird’s plumage. Sketching animals in their natural habitats can provide valuable insights into their anatomy and movement, translating beautifully into your crochet designs.
- Pop Culture & Fandoms: Are you a fan of a particular book, movie, or video game? Recreate your favorite characters in amigurumi form! This is a fantastic way to personalize your creations and connect with a community of like-minded individuals. Consider the character’s personality and incorporate it into the design – a mischievous glint in the eye, a determined set of the jaw, or a playful pose.
- Art & Design: Explore different art movements and design styles. Art Nouveau’s flowing lines could inspire elegant animal designs, while the bold colors of Pop Art could lead to quirky and playful crochet plushies. Look at textile art, sculpture, and even painting for ideas on form, texture, and color combinations.
- Everyday Objects: Sometimes, the most unexpected sources provide the best inspiration. A vintage teacup, a weathered piece of driftwood, or a colorful bouquet of flowers can spark an idea for a unique amigurumi design.
- Online Communities: Platforms like Ravelry, Pinterest, and Instagram are brimming with crochet animal patterns and inspiration. Follow your favorite designers, join groups, and participate in challenges to stay motivated and discover new techniques.
Expanding Your Skillset: Beyond the Basics
Once you’ve mastered the fundamental techniques, it’s time to push your boundaries and explore new possibilities.
- Advanced Stitch Techniques: Delve into more complex stitches like the popcorn stitch, the puff stitch, and the bobble stitch to add texture and dimension to your crochet animals. Experiment with different stitch combinations to create unique effects.
- Mixed Media: Don’t be afraid to incorporate other materials into your amigurumi creations. Felt, beads, embroidery floss, and even wire can be used to add details, embellishments, and structural support.
- Needle Felting Integration: Combining crochet with needle felting can create incredibly realistic details, particularly for animal faces and fur. Needle felting allows you to sculpt and blend fibers, adding a level of nuance that’s difficult to achieve with crochet alone.
- Doll Making Techniques: Learning doll-making techniques, such as jointing and sculpting, can elevate your amigurumi to a new level of realism and posability.
- Pattern Writing: A natural progression for many amigurumi enthusiasts is learning to write their own patterns. This not only solidifies your understanding of the craft but also allows you to share your creations with the world.
The Art of Customization: Making it Your Own
One of the most rewarding aspects of amigurumi is the ability to personalize your creations.
- Color Variations: Experiment with different color palettes to create unique and eye-catching crochet animals. Don’t be afraid to stray from the traditional colors and explore unexpected combinations.
- Accessory Design: Designing and creating accessories – hats, scarves, clothing, and even miniature props – can add personality and charm to your amigurumi.
- Facial Expressions: Subtle changes in the placement of the eyes, the shape of the mouth, and the angle of the eyebrows can dramatically alter an animal’s expression. Practice creating a range of emotions to bring your crochet animals to life.
- Size and Proportions: Play with the size and proportions of your amigurumi to create whimsical or realistic designs. A slightly oversized head or exaggerated features can add a touch of cuteness.
Troubleshooting and Learning from Mistakes
Even the most experienced crochet artists encounter challenges. Don’t be discouraged by mistakes; view them as opportunities for learning and growth.
- Common Issues: Uneven stuffing, misshapen limbs, and gaps in the stitches are common problems. Research solutions online, consult with other crochet artists, and practice your technique.
- Pattern Adjustments: Sometimes, a pattern may not work perfectly for your yarn or hook size. Don’t be afraid to make adjustments to ensure a good fit.
- Embrace Imperfection: Remember that handmade items are unique and imperfect. Don’t strive for absolute perfection; embrace the quirks and imperfections that give your crochet animals character.
Building a Community and Sharing Your Passion
Connecting with other crochet enthusiasts can provide support, inspiration, and a sense of belonging.
- Online Forums and Groups: Participate in online forums and groups dedicated to amigurumi. Share your creations, ask questions, and offer advice to others.
- Craft Fairs and Markets: Selling your crochet animals at craft fairs and markets is a great way to connect with potential customers and showcase your talent.
- Social Media: Use social media platforms like Instagram and Facebook to share your work, build a following, and connect with other crochet artists.
- Workshops and Classes: Consider teaching crochet workshops or classes to share your knowledge and inspire others.
A Guide to Starting a Business (For the Aspiring Entrepreneur)
If you dream of turning your crochet hobby into a business, here’s a brief overview of the steps involved:
- Market Research: Identify your target audience and assess the competition. What types of crochet animals are in demand? What are your competitors charging?
- Pricing Strategy: Calculate your costs (yarn, stuffing, eyes, time) and determine a fair price for your creations.
- Branding: Develop a unique brand identity that reflects your style and values.
- Online Store: Create an online store using platforms like Etsy or Shopify.
- Marketing: Promote your business through social media, online advertising, and word-of-mouth.
- Legal Considerations: Research the legal requirements for starting a business in your area.
A Final Thought: The Enduring Appeal of Handmade
In a world of mass-produced goods, there’s something truly special about a handmade crochet animal. Each stitch is infused with love, care, and creativity. These aren’t just toys; they’re heirlooms, companions, and expressions of artistry. The joy of creating these little creatures is immeasurable, and the ability to share that joy with others is a gift.
As WildWhiskers, a dedicated news platform for animal lovers around the world, we celebrate the connection between humans and animals in all its forms. From heartwarming stories about pets to the wild journeys of animals in nature, we bring you fun, thoughtful, and adorable content every day. With the slogan “Tiny Tails, Big Stories!”, WildWhiskers is more than just a news site — it’s a community for animal enthusiasts, a place to discover, learn, and share your love for the animal kingdom. Join WildWhiskers and open your heart to the small but magical lives of animals around us! The world needs more handmade joy, and crochet animals are a perfect way to spread it.


